
A journey in extending a ZFS volume pool on a FreeNAS virtual machine after changing vdisk size.
Skip to the procedure section to dig right into it
Background
Virtualizing I/O is perhaps one of the best ways to shoot yourself in the foot.
Or IS it?
You’re taking a piece of software of which its very namesake involves large I/O operations, and throwing it behind layers of abstraction.
When an I/O request is made from a VM, the hypervisor must both ascertain the source, and gain access to the destination by translating the abstracted storage location to a physical location – all while remaining secure.
Not to mention;

Your I/O heavy VM is contending for bandwidth across an already busy storage driver, to some storage which may also be shared by other VMs.
Furthermore, if you’re not even running a bare metal hypervisor and are using applications such as VMware Workstation or Oracle Virtualbox, then performance degrades further – since your hypervisor is now contending against the host operating system for I/O.
Why then, would one want to virtualize NAS?
As much of a sin this seems to be, there are some clear and powerful benefits to doing so.
Perhaps most obvious, you’re given the flexibility provided by any virtual system; simplified management, accurate hardware performance metrics, and one-click customization should you wish to change CPU/RAM/disks.
This ability to change the size of a VM’s disk is quite trivial.
Getting FreeNAS to realize the added space is another story altogether.
Furthermore, there are ways to eliminate I/O bottlenecks by using PCI pass through, giving VM access to raw disk.
Do note that certain hypervisor features are unavailable when doing so – taking VMware for example, where you will lose fault tolerance, HA, DRS, snapshots, and a few more.
And then there’s laziness factor; why go through the effort of setting up a whole new, dedicated machine just for NAS when I can just spin up a FreeNAS instance in minutes?
My use case is personal, and while certain pros/cons hold true between lab and production environments, research is key in determining whether NAS virtualization is best for you.
Procedure – Extending FreeNAS Pool Size after vDisk size change
When you increase the size of a virtual disk, it’s up to guest to resize/grow partitions to utilize the free space.
This is what the following procedure will cover; how to properly resize a volume after changing one of its disks’ dimensions – and having FreeNAS update pool size accordingly.
Note that the following procedure applies to FreeNAS 9.2.1 – however, it remains relevant for newer FreeNAS versions.
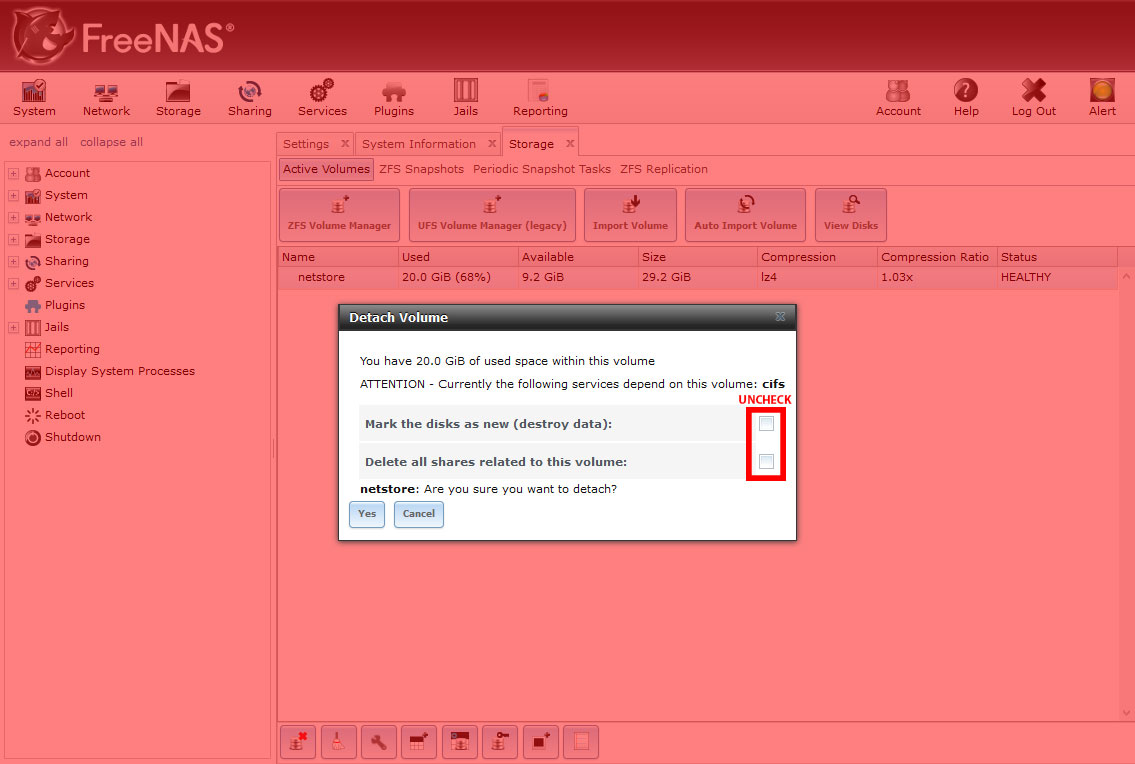
Step 1. Log into webmin, detach the volume being resized
Log into your FreeNAS web administration portal.
By detaching this volume, we can safely perform partition changes to disk(s) within.
UN-CHECK the destroy data and delete shares options.
Step 2. Shut down FreeNAS
Ensures that there are no lingering locks to this volume and/or its disks before we grow our drive(s).
Step 3. Grow drives
Grow vDisks using whatever means available – vboxmanage, vmkfstools, vmware-vdiskmanager, etc.
Step 4. Power on FreeNAS, and enter shell
Step 5. Enter the following commands in order:
zpool status
Retrieve the name(s) of partitions for each pool. One of these partitions will correlate to the disk(s) expanded.
NOTE down the gptid for YOUR pool – we will use this later.
glabel status
Resolves a partition name to drive name (Components column).
NOTE down the Components name for the partition identified previously – we will use this later.
gpart resize -i 2 /dev/da0
Replace da0 with drive name (Components name) identified previously.
This command will resize the specified disk.
On completion, a ‘resize successful’ message is given.
Step 6. Log into webmin, and auto import the pool
On successful auto import, you will see your volume under Storage > Active Volumes
Step 7. Bring device back online and expand pool size
Return back to your FreeNAS shell, and enter this final command to both bring the device online, and automatically update the pool size.
zpool online -e poolname /dev/gptid/some-long-gptid
Replace poolname with the component name from zpool status.
Replace some-long-gptid with the partition name from glabel status.
The ‘-e’ flag is meant to be used when a smaller disk has been replaced by a larger disk – which to the guest, is what we’ve done.
At this point, you should be able to refresh your webmin and note the changes in used/available/size for your particular volume in Storage > Active Volumes.
This of course, will also be reflected in any shares active.
Happy virtual NASing!
Further reading
Yes, You Can Virtualize FreeNAS, May 12, 2015, FreeNAS, FreeNAS Blog
This worked nicely – thanks. My FreeNAS setup appears to be 11.0, so the UI is a little different to this guide, but I managed to find everything I needed. I’m in the process of moving, expanding and upgrading my FreeNAS setup. It was a little more complex than this guide as I had two drives for storage – as an emergency stopgap (lasted a couple of years!) I had added a second storage drive using as much space as I could on the host; easier than expanding the disk! Now I’m on a new host I have acres of free space to play with, so I’ve expanded that second drive to the same size as the first. I’ll probably just add more drives as I need them now! Once I had expanded the drive I used its details in ‘zpool online -e poolname /dev/gptid/some-long-gptid’ at step 7. Note: you can you tab completion on the /dev/gptid/some-long-gptid bit 🙂 Also, I think you got the output of ‘zpool status’ and ‘glabel status’ muddle in step 7: zpool gives the pool name (which can probably be read out of the web admin anyway?), glabel gives that big fat juicy gptid.
Hey Will,
Glad to hear you’ve got your system chugging along!
Thanks for spotting that mix-up with Step 7 – I’ve updated the post to reflect that.
Here’s to more storage!
Cheers,
Alvin